Programming Exercise: Conway’s Game of Life in JavaScript and Canvas
Demo: http://nomatteus.github.com/conway-game-of-life-js/examples/
Code: https://github.com/nomatteus/conway-game-of-life-js
What is Conway’s Game of Life?
Wikipedia has a good article. Excerpt:
The Game of Life, also known simply as Life, is a cellular automaton devised by the British mathematician John Horton Conway in 1970. The “game” is a zero-player game, meaning that its evolution is determined by its initial state, requiring no further input. One interacts with the Game of Life by creating an initial configuration and observing how it evolves.
Rules
The universe of the Game of Life is an infinite two-dimensional orthogonal grid of square cells, each of which is in one of two possible states, alive or dead. Every cell interacts with its eight neighbours, which are the cells that are horizontally, vertically, or diagonally adjacent. At each step in time, the following transitions occur:
- Any live cell with fewer than two live neighbours dies, as if caused by under-population.
- Any live cell with two or three live neighbours lives on to the next generation.
- Any live cell with more than three live neighbours dies, as if by overcrowding.
- Any dead cell with exactly three live neighbours becomes a live cell, as if by reproduction.
Coding
I remember playing around with the Game of Life many years ago, and have always thought it would be fun to program it. It’s a relatively simple programming exercise–you just need a grid of cells, and then apply the 4 rules of the Game of Life.
After finishing the main coding, I added an option to make the grid “colourful”. All this does is use a random color for each cell, instead of making everything black, but I like the results!
Some other things I could add:
- Work on creating a more efficient algorithm, i.e. don’t check each cell in areas that you know won’t change in the next few generations
- Make an interface to create/draw grids, and a way to import/share them
- Similar to the above, create a better way to make grids in code, to avoid having to have huge arrays of 0’s
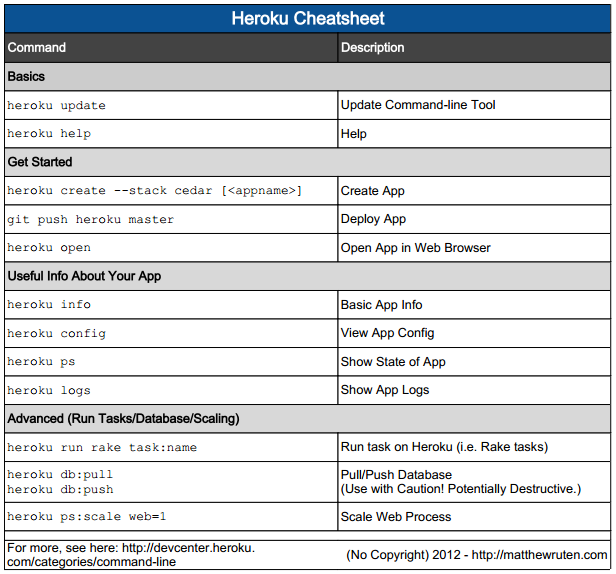
Heroku Cheatsheet (Useful Heroku Commands Reference)
Basics
Update Command-line Tool
 heroku update
Help
 heroku help
Get Started
Create App
 heroku create --stack cedar [<appname>]
Deploy App
 git push heroku master
Open App in Web Browser
 heroku open
Useful Info About Your App
Basic App Info
 heroku info
View App Config
 heroku config
Show State of App
 heroku ps
Show App Logs
 heroku logs
Advanced (Run Tasks/Database/Scaling)
Run task on Heroku (i.e. Rake tasks)
 heroku run rake task:name
Pull/Push Database (Use with Caution! Potentially Destructive.)
 heroku db:pull
heroku db:push
Scale Web Process
 heroku ps:scale web=1
Set timezone for app. (Use TZ time zones from here [wikipedia].)
 heroku config:add TZ=America/Vancouver
For more, see here: http://devcenter.heroku.com/categories/command-line
Bonus Tip!
Avoid Free App (1 Web Dyno) Idling
Install New Relic Addon (Free): http://addons.heroku.com/newrelic
And Configure: http://devcenter.heroku.com/articles/newrelic
And then setup Availability Monitoring in “Menu > Settings > Availability Monitoring”
Download PDF Version (heroku_cheatsheet.pdf)
Quantified Self – What I Track: Health & Fitness, Calories Consumed Version
I attended a quantified self meetup last week, and was inspired to post about what I track, and also some analysis of the numbers. This is the first instalment.
I’ve been tracking daily calories consumed for about a year, off and on.
There are a ton of apps that you can use to track your food intake. I use MyFitnessPal (mostly the app, but they also have a website), because I like their extensive database of foods. They allow users to add foods, so almost every major brand/restaurant food item is already in their database. This makes it easy to track your meals without entering in all the nutrition info yourself.
I try to log most days, though sometimes I get sick of it. By now, I am able to get a good idea about how much I’m eating without looking everything up, so the need to track isn’t as strong. Also, I’ll admit, some days I know I’m going to eat too much or crappy food and then I won’t track that day, because what’s the use? (Then sometimes I know I want to eat things I shouldn’t, but force myself to track it anyway, so I am at least aware of how much I am consuming.)
Why track? My main goal in tracking every calorie is to keep under a certain daily goal. I’m not really tracking to analyze the data over time or anything–it’s to teach me how to modify my food intake to stay under my goal. The eventual ideal is that I moderate my food take by myself, without tracking.
How? Most of the times, I track as I go, and size my meals appropriate to how much I’ve already had that day. Then other times, I use it as a planning tool, and enter in my meals the day before, so I can be sure it all adds up, and there’s balance between the meals. The latter is usually when I’m making all my own food–it’s a bit hard to plan like that when eating out.
McDonalds is great for calorie counters! Because they are so consistent, and post calorie counts for every item, it’s easy to control how many calories you eat. In most non-fast food restaurants, you don’t know how many calories are in the food, and it’s likely more than it appears. They make food taste better by adding more butter! This is why making your own food is better in every way, since you can control exactly what goes into it.
Get a food weigh scale if you want to count calories. It makes tracking so much easier; I use mine all the time! It basically replaces measuring cups, too.
I don’t see myself doing this forever. The main goal is to gain awareness of how much I’m eating. Once I’ve learned to do that on my own, I will drop the tracking.


