Run a Single Rails or Ruby Test from the Command Line
Sometimes when focusing on a specific area/method in a project, you may not want to run the full test suite every time you make a change. This is especially true in Rails projects, since tests can take a while to run.
Here’s how to run a single method of a test:
ruby -I test test/path/to/the_test.rb -n test_method_name
You can also run all tests in a single file with:
ruby -I test test/path/to/the_test.rb
The above works for Rails tests, since the test helper loads the Rails environment, but this is an alternative way to run tests in a single file in the context of Rails:
rake test TEST=test/path/to_file.rb
And as a general Rails testing note, if there are database issues, run db:test:prepare before running tests, (runs all database migrations).
For Sublime Text 2 users, the RubyTest package is worth a mention. It can run a single test or all tests from within Sublime: https://github.com/maltize/sublime-text-2-ruby-tests
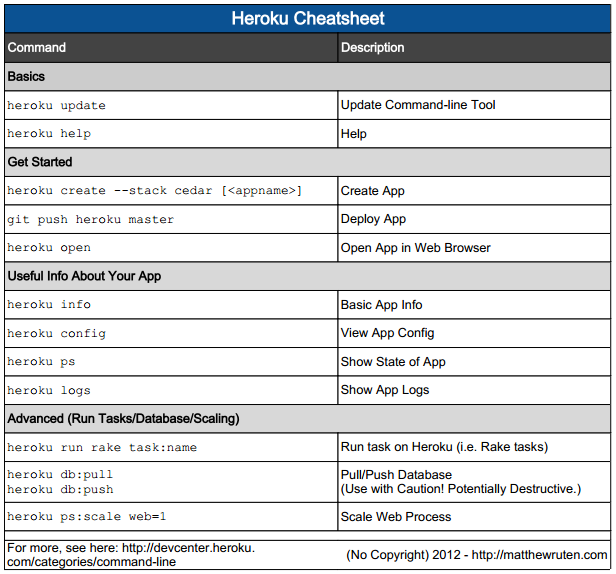
Heroku Cheatsheet (Useful Heroku Commands Reference)
Basics
Update Command-line Tool
 heroku update
Help
 heroku help
Get Started
Create App
 heroku create --stack cedar [<appname>]
Deploy App
 git push heroku master
Open App in Web Browser
 heroku open
Useful Info About Your App
Basic App Info
 heroku info
View App Config
 heroku config
Show State of App
 heroku ps
Show App Logs
 heroku logs
Advanced (Run Tasks/Database/Scaling)
Run task on Heroku (i.e. Rake tasks)
 heroku run rake task:name
Pull/Push Database (Use with Caution! Potentially Destructive.)
 heroku db:pull
heroku db:push
Scale Web Process
 heroku ps:scale web=1
Set timezone for app. (Use TZ time zones from here [wikipedia].)
 heroku config:add TZ=America/Vancouver
For more, see here: http://devcenter.heroku.com/categories/command-line
Bonus Tip!
Avoid Free App (1 Web Dyno) Idling
Install New Relic Addon (Free): http://addons.heroku.com/newrelic
And Configure: http://devcenter.heroku.com/articles/newrelic
And then setup Availability Monitoring in “Menu > Settings > Availability Monitoring”
Download PDF Version (heroku_cheatsheet.pdf)
How to Access 1Password.html Locally in Google Chrome
1Password is a great program, but one thing it doesn’t handle well is multiple password databases. I use 1Password at work and at home, and sometimes I want to access my home password database. To view another database, you have to go to “Preferences“, and “Choose Another Data File…“, find your file, then repeat to switch back to your main database. Pretty clunky.
Luckily, for read-only access, you can open the 1Password.html file and view your passwords in a basic interface using a web browser (if you’re using Finder on Mac OS X, right-click your 1Password.agilekeychain file and choose “Show Package Contents” to see the HTML file).
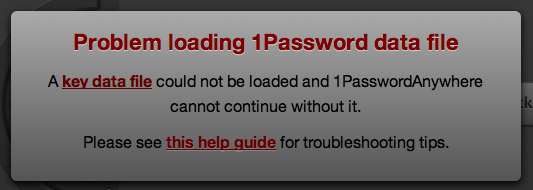
However, if you’re using Google Chrome, you will see this:
How to Fix the “Problem loading 1Password data file” Error
A simple solution is on the 1Password web site:
The easiest way to workaround this is to store your 1Password.agilekeychain file on a web server or service like Dropbox. If you need offline access to 1PasswordAnywhere you will need to use another browser or modify Chrome’s settings by adding the –allow-file-access-from-files command line option.
A more complex solution is below.
How to “Jailbreak” Your Kindle for Custom Screensavers and Fonts
Note (May 31, 2012): This was accurate as of April 2011, and may not work on the newer Kindles. I used this information to get custom screensavers on my Kindle Keyboard (as it is now called).
Note: This applies to the Kindle 3 running the latest software update, 3.1. For Kindle 2 and Kindle 3 running pre-3.1 software, see the Mobile Read forums or wiki.
Download the Jailbreak Here: http://yifan.lu/p/kindle-jailbreak
Follow this guide to get custom screensavers working: http://wiki.mobileread.com/wiki/Kindle_Screen_Saver_Hack_for_all_2.x_and_3.x_Kindles
How to Move the Cursor in Mac OS X Terminal (Bash)
Moving around the terminal one character at a time is slow and gets annoying, so here’s how to move around word by word:
ctrl-a: move to front of line
ctrl-e: move to end of line
ctrl-w: delete word before cursor
By default, the shortcuts for moving left and right are Esc-b and Esc-f. It’s much handier to use Alt/Option-left and -right, so this is how you can configure terminal to do that:
To configure it to Alt + left and right:- Open Terminal preferences (command + ,);- At Keyboard tab, select "control cursor left (or right)" and doubleclick it;- Left: Select the combo "modifier" to "option" and the action to �33b- Right: Select the combo "modifier" to "option" and the action to �33f
Sources:
http://www.infoentropy.com/terminal_window_keyboard_shortcuts_mac_linux
http://snipplr.com/view/28113/config-terminal-to-move-wordbyword/
Resume Downloads from FTP using CURL
This is how you can resume a download when using Curl. Helpful for large files, mostly.
curl -C - ftp://siteorip.com/filename.zip --user username --verbose > savetothis_filename.zip

-C -                           - resumes download (if supported)
--user username"               - will prompt for password (if needed)
--verbose"                     - see what's going on
> savetothis_filename.zip      - file to output to
Untar Files Mac OS X Terminal
This is how you can untar a file in the terminal in Mac OS X:
tar -zxvf myfile.tar.gz
more timbits at http://cheats.z00x.com/unix
How to Backup iPhone SMS Messages for Free (No Jailbreak Needed)
Recently, I did a full restore on my iPhone to try and fix some of the many problems I’ve been having (we’ll save that list for another day). While SMS messages are generally temporary in nature, I decided to find out if I could export them somehow. There are a few programs out there that claim to be able to do this for you, such as MobileSyncBrowser (Mac/PC, free trial/$10/$20), iPhone / iPod Touch Backup Extractor (Mac, free), or an online tool like iphone backup sms extractor. I didn’t try any of these because I don’t want to pay, I am not on a Mac, and I don’t want to upload my private messages to some random site. Luckily, I discovered that it’s not too hard to do it yourself. Grab your iPhone, put on your techie hat, and follow the 3 easy steps after the break!


